3招教你如何完成微信礼物打赏技巧 (代码全)
微信(WeChat)是腾讯公司于2011年1月21日推出的一个为智能终端提供即时通讯服务的免费应用程序,由张小龙所带领的腾讯广州研发中心产品团队打造 [2] 。微信支持跨通信运营商、跨操作系统平台通过网络快速发送免费(需消耗少量网络流量)语音短信、视频、图片和文字,同时,也可以使用通过共享流媒体内容的资料和基于位置的社交插件“摇一摇”、“漂流瓶”、“朋友圈”、”公众平台“、”语音记事本“等服务插件。
教程中的内容未实现识别哪个帖子或文章收到的打款,当然我的站点已经实现,你可以试试哈。有段时间没有写实战类的文章了,今天分享一篇,使用yii2+houjs+yii2-wx实现微信送礼物功能。
先来个效果图
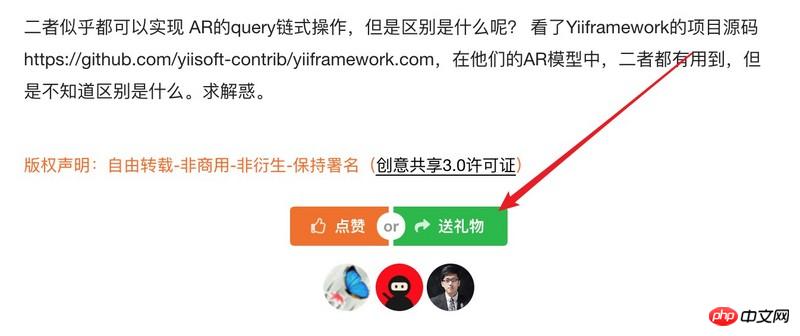
简单点说就是点击“送礼物”按钮后出现一个弹出框,里面有很多礼物,点击某个礼物后弹出框刷新并出现一个二维码,微信扫码支付。
当然这个钱会进入到会员的个人账号内,然后提现。
为何要做这样一个功能那? 说心里话我真心没想过通过这个得到多少,更多算一种激励吧,如果你在我们学习社群分享了有价值的文章,你非常有可能受到我的礼物。
好了,还是说功能吧,功能有几个
我勒个去,干货满满呀。开始。
数据表结构
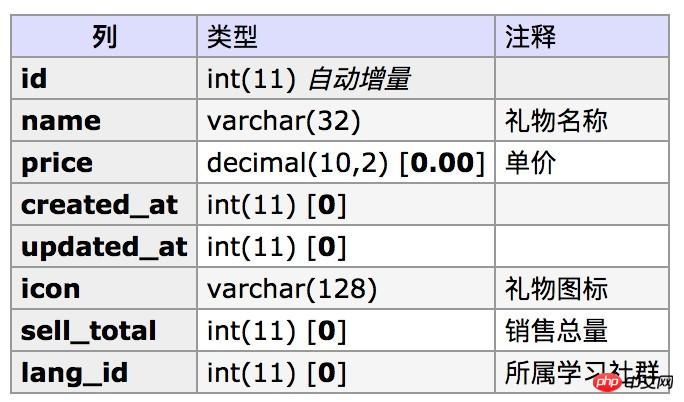
既然是送礼品,那自然包含礼品表,还有送礼物的日志表,我规划如下。
礼物表gift
礼物日志表gift_log
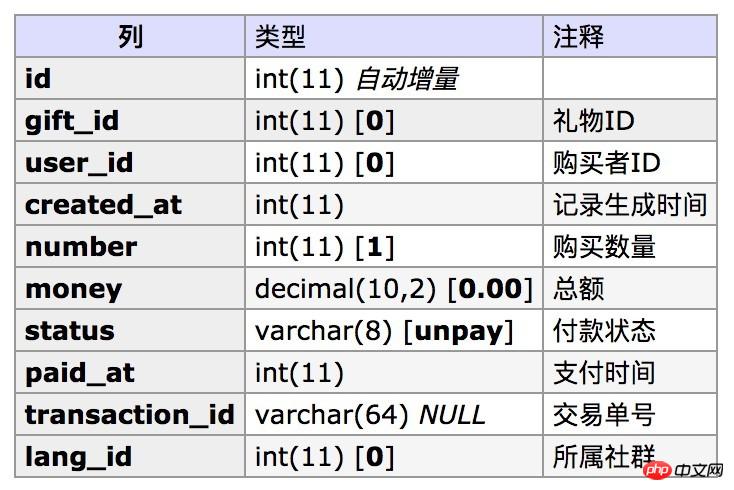
对于 gift_log 表可以不用lang_id,这里为了统计方便添加了这个字段。
整体思路
用户送礼物的整体逻辑如下
点击“送礼物”和后台进行交互获取此社群礼物列表。
获取数据后使用jsmart引擎渲染出具体礼物的html代码。
使用modal将礼物列表放到弹出框弹出。
点击礼物和后台交互,后台生成二维码返回。
用户扫码付款。
付款成功。
获取礼物列表
接下来我们使用houjs来构建前台功能,关于houjs的使用可以去社群查看 传送门,我们主要使用其modal弹出框助手和jsmart模板引擎。
首先指定一个按钮
<button class="ui green button" id="giftBtn" data-url="<?= Url::to(['/gift/list','id'=>$lang->id]);?>">
    <i class="share icon"></i>送礼物
</button>
data-url代表用于获取礼物列表的路由,为按钮做一个click事件处理
requirejs(['mods/modal','jSmart'],function(modal,jSmart){
    $('#giftBtn').click(function(){
        var url = $(this).attr('data-url');
        $.getJSON(url,{},function(d){
            if(d.result === 'ok'){
                // d.data
            }else{
                modal.msg(d.message);
            }
        });
    });
})
发起了一个请求用来获取礼物列表,如果失败则提示错误信息。
接下来我们新建GiftController.php并定义list动作。
public function actionList($id){
Yii::$app->response->format = 'json';
try {
$data = Gift::find()->where(['lang_id'=>$id])->asArray()->all();
return ['result'=>'ok','data'=>$data];
}catch(Exception $e){
return ['result'=>'fail','message'=>$e->getMessage()];
}
}从这里我们知道现在点击按钮后获得的数据里d.data就是此社群的礼物列表。
当前台得到了礼物列表后,使用jsmart将数据转换成html代码,为此我们需要先做一个jsmart的模板,在送礼物按钮页面增加此模板。
<script id="giftTpl" type="text/x-jsmart-tmpl">
<p class="gifts-box">
<p class="gifts">
{foreach $data as $key=>$gift}
<a href="">
<p class="gift-icon"><img src='{$gift.icon}'/></p>
<p class="gift-name">{$gift.name}</p>
</a>
{/foreach}
</p>
</p>
</script>这个模板的大体意思就是讲过来的d.data中的数据进行循环,每个礼物放到标签a中,然后我们向后台获取礼物列表的js代码进行补充,如下。
requirejs(['mods/modal','jSmart'],function(modal,jSmart){
$('#giftBtn').click(function(){
var url = $(this).attr('data-url');
$.getJSON(url,{},function(d){
if(d.result === 'ok'){
var tplText = $('#giftTpl').html();
var compiledTemplate = new jSmart(tplText);
var output = compiledTemplate.fetch(d);
modal.alert(output,{
inPage:false,
title:'送礼物',
size:'tiny'
});
}else{
modal.msg(d.message);
}
});
});
})进行模板渲染,到了我们看效果的时候了。
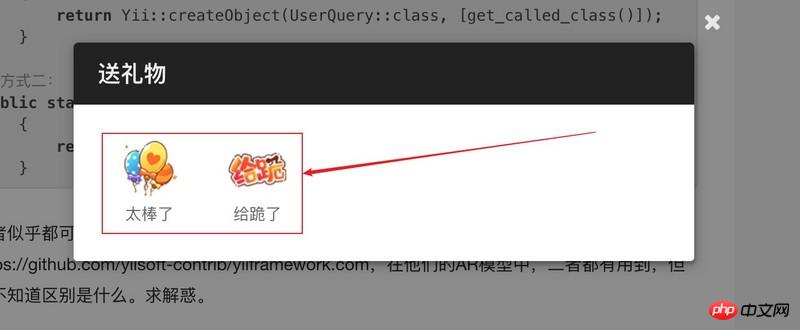
我很喜欢,使用yii2和houjs的modal&jsmart,完成了礼物列表的功能。接下来我们要做一个重要的事情,和后台交互并且得到支付二维码。
得到支付二维码
在本章我们使用yii2-wx扩展实现微信支付功能,其思路点击礼物后获取支付二维码。
在进行之前我们对上一步的js方法进行优化,将代码放到一个单独的js模块中,在houjs中对于业务上的js代码推荐放到houjs/js/modules中,如下
define(function(require,exports,modules){
var modal = require('mods/modal');
var jSmart = require('jSmart');
exports.list = function(){
$('#giftBtn').click(function(){
var url = $(this).attr('data-url');
$.getJSON(url,{},function(d){
if(d.result === 'ok'){
var tplText = $('#giftTpl').html();
var compiledTemplate = new jSmart(tplText);
var output = compiledTemplate.fetch(d);
modal.alert(output,{
inPage:false,
title:'送礼物给作者',
size:'tiny'
});
}else{
modal.msg(d.message);
}
});
});
};
});因此获取礼物列表的js代码调用就变的简单了,如下
requirejs(['modules/gift'],function(gift){
gift.list();
})以后关于gift的js代码都可以放到houjs/js/modules/gift.js中。
好,还是说本部分话题。如何获取支付二维码?
我的思路如下:用户点击每个礼品后发起一次get请求到服务器,本次请求包含了礼物的ID,后台收到后生成送礼物日志并和微信服务器通讯得到支付二维码,返回给浏览器,前台渲染此二维码。
说干就干。
首先补充礼物列表,每个礼物的a链接,如下
<script id="giftTpl" type="text/x-jsmart-tmpl">
<p class="gifts-box">
<p class="gifts">
{foreach $data as $key=>$gift}
<a class="_get_qrcode" href="javascript:;" data-url="<?= Url::to(['/gift/qrcode']);?>?id={$gift.id}">
<p class="gift-icon"><img src='{$gift.icon}'/></p>
<p class="gift-name">{$gift.name}</p>
</a>
{/foreach}
</p>
</p>
</script>我们为每个礼物的a链接设置了3个属性
class="_get_qrcode" 一个类,这个类并不起到样式作用,主要是为js监听此标签使用。
href="javascript:;" 防止点击跳转
data-url 点击连接后,js函数将根据data-url提供的地址发起请求
接下来我们做一个js方法实现a链接点击的监听,如下
// houjs/js/modules/gift.js
define(function(require,exports,modules){
var modal = require('mods/modal');
var jSmart = require('jSmart');
.....
/**
* 获取某一个礼物的支付二维码
*/
exports.qrcode = function(){
$('._get_qrcode').click(function(){
var url = $(this).attr('data-url');
$.getJSON(url,{},function(d){
if(d.result === 'ok'){
$('#payQrcode')
.html("<img width='120' src='"+d.qrcode+"'/>");
}else{
modal.msg(d.message);
}
});
});
};
});有一点要说明,因此礼物列表是在页面dom渲染后加入的html代码,因此如果想让礼物列表的a链接被监听,在获取礼物列表成功后需要调用exports.qrcode()函数进行监听,如下
// houjs/js/modules/gift.js
define(function(require,exports,modules){
var modal = require('mods/modal');
var jSmart = require('jSmart');
exports.list = function(){
$('#giftBtn').click(function(){
var url = $(this).attr('data-url');
$.getJSON(url,{},function(d){
if(d.result === 'ok'){
....
exports.qrcode();
}else{
modal.msg(d.message);
}
});
});
};
/**
* 获取某一个礼物的支付二维码
*/
exports.qrcode = function(){
....
};
});此刻用户点击了礼物的a链接,gift.qrcode()方法开始运作,请求达到了yii2的gift/qrcode动作,我写了如下代码。
// yii2 GiftController/actionQrcode
<?php
namespace app\controllers;
use app\models\Gift;
use app\models\GiftLog;
use yii\helpers\Url;
use abei2017\wx\Application;
use Da\QrCode\QrCode;
use Yii;
use yii\base\Exception;
class GiftController extends NBase {
....
public function actionQrcode($id){
Yii::$app->response->format = 'json';
try {
$model = Gift::findOne($id);
// order
$order = new GiftLog();
$order->gift_id = $id;
$order->user_id = Yii::$app->user->id;
$order->created_at = time();
$order->number = 1;
$order->money = $order->number*$model->price;
$order->status = 'unpay';
$order->lang_id = $model->lang_id;
if($order->save() == false){
throw new Exception(implode(',',$order->getFirstErrors()));
}
$out_trade_no = "gift-{$order->id}-".rand(1000,9999);
$totalFee = $order->money*100;
$conf = Yii::$app->params['wx'];
$app = new Application(['conf'=>$conf['mp']]);
$pay = $app->driver("mp.pay");
$attributes = [
'body'=>"送礼物",
'detail'=>"{$model->name}",
'out_trade_no'=>$out_trade_no,
'total_fee'=>$totalFee,
'notify_url'=>Yii::$app->urlManager->createAbsoluteUrl(['/gift/notify']),
'product_id'=>'gift-'.$id
];
$native = $pay->native($attributes);
$qrCode = (new QrCode($native['code_url']))->setSize(250)->setMargin(20);
return ['result'=>'ok','qrcode'=>$qrCode->writeDataUri()];
}catch(Exception $e){
return ['result'=>'fail','message'=>$e->getMessage()];
}
}
}首先要说明的是上述代码没有问题,但如果上线还是要处理细节的。
在actionQrcode方法中我们做了3件事情
生成送礼物日志
调用yii2-wx生成支付二维码
使用QrCode生成二维码并传给浏览器
这里使用的是yii2-wx提供的生成二维码方法native,剩下的事情就是如何显示这个二维码。
为了让用户可以在支付前重新选择礼物,本次并没有选择弹出二维码,而是使用了礼物页面替换的方法,如下图
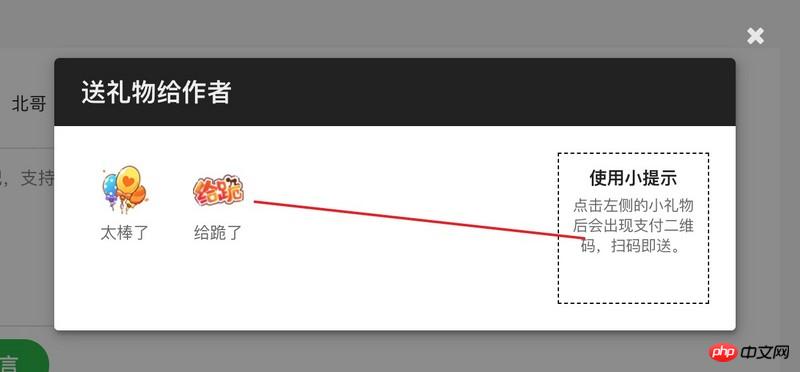
在礼物的右侧我增加了一个p来存放二维码,没有选择的时候用一些帮助来填充。这个二维码的存放工作由gift.qrcode()方法实现
$('#payQrcode').html("<img width='120' src='"+d.qrcode+"'/>");对应的礼物列表模板也增加了支付区域
<script id="giftTpl" type="text/x-jsmart-tmpl">
<p class="gifts-box">
<p class="gifts">
{foreach $data as $key=>$gift}
<a class="_get_qrcode" href="javascript:;" data-url="<?= Url::to(['/gift/qrcode']);?>?id={$gift.id}">
<p class="gift-icon"><img src='{$gift.icon}'/></p>
<p class="gift-name">{$gift.name}</p>
</a>
{/foreach}
</p>
<p id="payQrcode">
<h1>使用小提示</h1>
<p>
点击左侧的小礼物后会出现支付二维码,扫码即送。
</p>
</p>
<p class="clear"></p>
</p>
</script>好,看下效果。
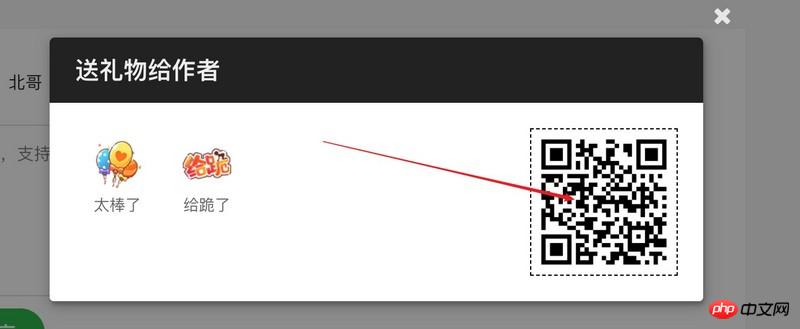
用户拿手机支付
当用户得到支付二维码后必然是扫码支付,接下来有两个事情要做
先来处理结果通知,这个使用yii2-wx非常好实现。在GiftController中增加一个notify动作。
// GiftController.php
<?php
namespace app\controllers;

use app\models\Gift;
use app\models\GiftLog;
use yii\data\ActiveDataProvider;
use yii\helpers\Url;
use abei2017\wx\Application;
use Da\QrCode\QrCode;
use Yii;
use yii\base\Exception;

class GiftController extends NBase {

    public $enableCsrfValidation = false;

    ......

    public function actionNotify(){
        $conf = Yii::$app->params['wx'];
        $app = new Application(['conf'=>$conf['mp']]);
        $pay = $app->driver("mp.pay");

        $response = $pay->handleNotify(function($notify,$isSuccess){
            if($isSuccess){
                @list($_,$id,$_) = explode('-',$notify['out_trade_no']);

                $model = GiftLog::findOne($id);
                if($model->status == 'pay'){
                    return true;
                }

                $model->status = 'pay';
                $model->paid_at = time();
                $model->transaction_id = $notify['transaction_id'];
                $model->update();

                return true;
            }
        });

        return $response;
    }

}对上面的逻辑有几点要注意,这也是我们用yii2-wx的时候要注意的。
现在我们搞定了回调,看下效果。

不错不错
离成功越来越近了!接下来我们要解决一个问题,就是当用户支付后在浏览器上礼物列表的变化,我希望二维码消失同时出现一个支付成功的页面。
我需要一个轮询,那么开始吧,为此我在gift.js中增加一个轮询功能,这个功能在渲染出二维码后被触发。
//gift.js
exports.askIsPay = function(id){
var url = '/gift/is-pay.html';
$.getJSON(url,{id:id},function(d){
if(d.result === 'ok'){
$('#payQrcode').empty()
.html("<h1>支付成功</h1><p>感谢您对作者的支持,他会知道您的名字以及打款。</p>");
}else{
setTimeout(function(){
exports.askIsPay(id)
},3000);
}
});
}每3秒询问一次服务器上gift/is-pay动作是否此送礼物日志已经付款,当然要告诉是哪个订单,如果已经付款则改变p#payQrcode的内容,否则继续调用exports.askIsPay(id)再一次询问。一点注意的是我们在生成二维码的时候需要服务器将此日志的id返回(这需要服务器的gift/qrcode动作返回此送礼物日志的ID),当exports.askIsPay触发时export.qrcode将其传入。
...
if(d.result === 'ok'){
$('#payQrcode').empty()
.html("<img width='120' src='"+d.qrcode+"'/>");
exports.askIsPay(d.oId);
}else{
modal.msg(d.message);
}
...当然我们还要在服务器上新建一个控制器的动作。
// GiftController.php
public function actionIsPay($id){
Yii::$app->response->format = 'json';
try {
$model = GiftLog::findOne($id);
if($model->status == 'unpay'){
throw new Exception('还没有支付');
}
return ['result'=>'ok'];
}catch(Exception $e){
return ['result'=>'fail','message'=>$e->getMessage()];
}
}大功告成,看看效果。
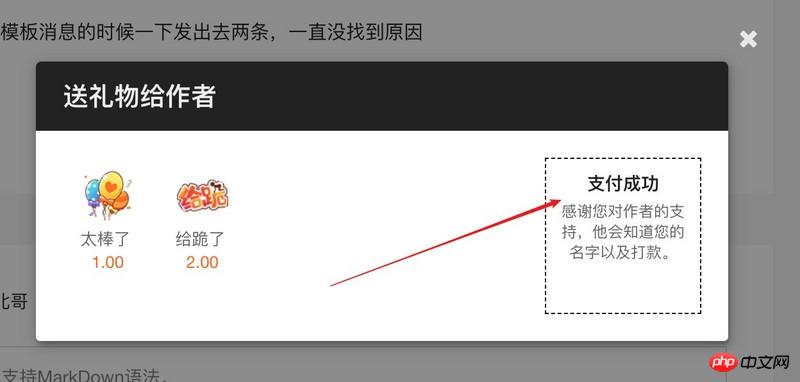
小结
到此我们就完成了永不打赏礼物的全过程,算上部吧,下部我们将实现具体的打款到用户账号以及使用yii2-wx调用微信企业付款到零钱包接口实现钱到微信功能。
相关推荐:
微信小程序开发实战视频教程
TP5.0实现简易管理员登录注册功能
以上就是三招教你怎样实现微信礼物打赏功能 (代码全)的详细内容,更多请关注php中文网其它相关文章!
微信提供公众平台、朋友圈、消息推送等功能,用户可以通过“摇一摇”、“搜索号码”、“附近的人”、扫二维码方式添加好友和关注公众平台,同时微信将内容分享给好友以及将用户看到的精彩内容分享到微信朋友圈。
……


