微信小程序label组件详细说明案例代码
微信小程序,简称小程序,英文名Mini Program,是一种不需要下载安装即可使用的应用,它实现了应用“触手可及”的梦想,用户扫一扫或搜一下即可打开应用。小程序是一种不用下载就能使用的应用,也是一项门槛非常高的创新,经过将近两年的发展,已经构造了新的小程序开发环境和开发者生态。
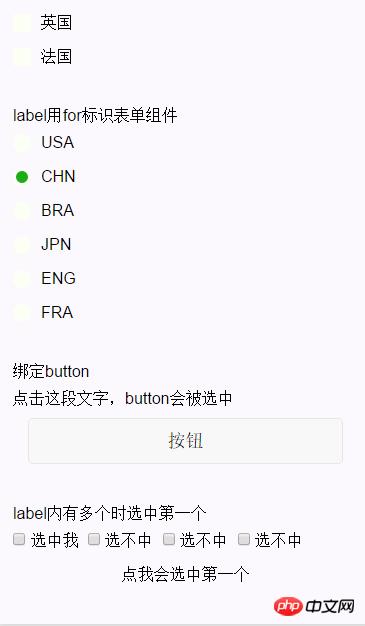
这篇文章主要介绍了微信小程序 label 组件详解及简单实例的相关资料,需要的朋友可以参考下实现效果图:

用来改进表单组件的可用性,使用for属性找到对应的id,或者将控件放在该标签下,当点击时,就会触发对应的控件。
for优先级高于内部控件,内部有多个控件的时候默认触发第一个控件。
目前可以绑定的控件有:button, checkbox, radio, switch。
| 属性名 | 类型 | 说明 |
|---|---|---|
| for | String | 绑定控件的id |
示例代码:
<view class="section section_gap">
<view class="section__title">表单组件在label内</view>
<checkbox-group class="group" bindchange="checkboxChange">
 <view class="label-1" wx:for-items="{{checkboxItems}}">
 <label>
  <checkbox hidden value="{{item.name}}" checked="{{item.checked}}"></checkbox>
  <view class="label-1__icon">
  <view class="label-1__icon-checked" style="opacity:{{item.checked ? 1: 0}}"></view>
  </view>
  <text class="label-1__text">{{item.value}}</text>
 </label>
 </view>
</checkbox-group>
</view>

<view class="section section_gap">
<view class="section__title">label用for标识表单组件</view>
<radio-group class="group" bindchange="radioChange">
 <view class="label-2" wx:for-items="{{radioItems}}">
 <radio id="{{item.name}}" hidden value="{{item.name}}" checked="{{item.checked}}"></radio>
 <view class="label-2__icon">
  <view class="label-2__icon-checked" style="opacity:{{item.checked ? 1: 0}}"></view>
 </view>
 <label class="label-2__text" for="{{item.name}}"><text>{{item.name}}</text></label>
 </view>
</radio-group>
</view>


<view class="section section_gap">
<view class="section__title">绑定button</view>
<label class="label-3">
 <text>点击这段文字,button会被选中</text>
</label>
<view class="btn-area">
 <button type="default" name="1" bindtap="tapEvent">按钮</button>
</view>
</view>

<view class="section section_gap">
<view class="section__title">label内有多个时选中第一个</view>
<label class="label-4">
 <checkbox> 选中我 </checkbox>
 <checkbox> 选不中 </checkbox>
 <checkbox> 选不中 </checkbox>
 <checkbox> 选不中 </checkbox>
 <view class="label-4_text">点我会选中第一个</view>
</label>
</view>
Page({
data: {
checkboxItems: [
{name: 'USA', value: '美国'},
{name: 'CHN', value: '中国', checked: 'true'},
{name: 'BRA', value: '巴西'},
{name: 'JPN', value: '日本', checked: 'true'},
{name: 'ENG', value: '英国'},
{name: 'TUR', value: '法国'},
],
radioItems: [
{name: 'USA', value: '美国'},
{name: 'CHN', value: '中国', checked: 'true'},
{name: 'BRA', value: '巴西'},
{name: 'JPN', value: '日本'},
{name: 'ENG', value: '英国'},
{name: 'TUR', value: '法国'},
],
hidden: false
},
checkboxChange: function(e) {
var checked = e.detail.value
var changed = {}
for (var i = 0; i < this.data.checkboxItems.length; i ++) {
if (checked.indexOf(this.data.checkboxItems[i].name) !== -1) {
changed['checkboxItems['+i+'].checked'] = true
} else {
changed['checkboxItems['+i+'].checked'] = false
}
}
this.setData(changed)
},
radioChange: function(e) {
var checked = e.detail.value
var changed = {}
for (var i = 0; i < this.data.radioItems.length; i ++) {
if (checked.indexOf(this.data.radioItems[i].name) !== -1) {
changed['radioItems['+i+'].checked'] = true
} else {
changed['radioItems['+i+'].checked'] = false
}
}
this.setData(changed)
}
})