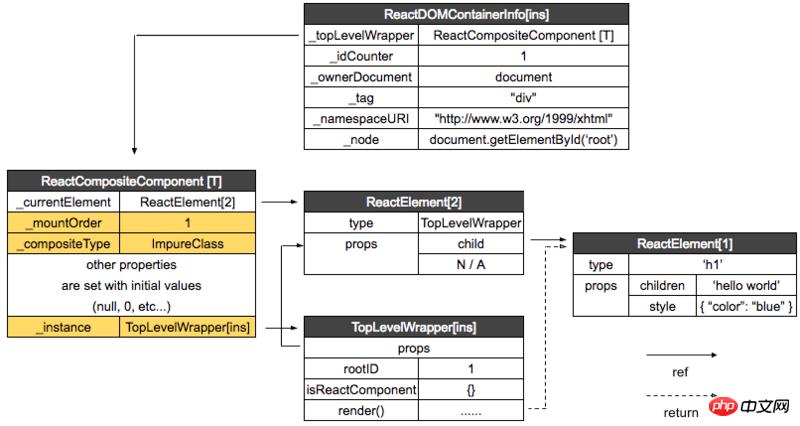
现在各实例间的关系是这样的:

再继续看 mountComponent 方法:
// 文件位置:src/renderers/shared/stack/reconciler/ReactCompositeComponent.js
mountComponent: function (
transaction,
hostParent,
hostContainerInfo,
context
) {
...
// this._currentElement 为ReactElement[2](TopLevelWrapper)
var publicProps = this._currentElement.props;
var publicContext = this._processContext(context);
// TopLevelWrapper
var Component = this._currentElement.type;
...
// Initialize the public class
var doConstruct = shouldConstruct(Component);
// 生成TopLevelWrapper 实例
var inst = this._constructComponent(
doConstruct,
publicProps,
publicContext,
updateQueue
);
...
var markup;
...
markup = this.performInitialMount(renderedElement,
hostParent, hostContainerInfo, transaction, context
...
return markup;
},
performInitialMount: function (renderedElement, hostParent,
hostContainerInfo, transaction, context) {
// TopLevelWrapper 实例
var inst = this._instance;
...
// If not a stateless component, we now render
if (renderedElement === undefined) {
// 返回值为 ReactElement[1]
renderedElement = this._renderValidatedComponent();
}
// 返回 ReactNodeTypes.HOST
var nodeType = ReactNodeTypes.getType(renderedElement);
this._renderedNodeType = nodeType;
// instantiateReactComponent.js
var child = this._instantiateReactComponent(
renderedElement,
nodeType !== ReactNodeTypes.EMPTY /* shouldHaveDebugID */
);
this._renderedComponent = child;
var markup = ReactReconciler.mountComponent(
child,
transaction,
hostParent,
hostContainerInfo,
this._processChildContext(context),
debugID
);
...
return markup;
},当运行到var child = this._instantiateReactComponent时,就会调用上篇文章说到的instantiateReactComponent文件:
// 文件位置:src/renderers/shared/stack/reconciler/instantiateReactComponent.js
function instantiateReactComponent(node, shouldHaveDebugID) {
var instance;
...
} else if (typeof node === 'object') {
...
// element.type 为 ‘h1’
if (typeof element.type === 'string') {
instance = ReactHostComponent.createInternalComponent(element);
}
return instance;
}ReactDom 会在执行的时候,执行ReactDefaultInjection.inject()将 ReactDOMComponent 注入到 ReactHostComponent 中,ReactHostComponent.createInternalComponent 最终会调用 ReactDOMComponent:
// 文件位置:src/renderers/dom/shared/ReactDomComponent.js
function ReactDOMComponent(element) {
// h1
var tag = element.type;
validateDangerousTag(tag);
// ReactElement[1]
this._currentElement = element;
this._tag = tag.toLowerCase();
this._namespaceURI = null;
this._renderedChildren = null;
this._previousStyle = null;
this._previousStyleCopy = null;
this._hostNode = null;
this._hostParent = null;
this._rootNodeID = 0;
this._domID = 0;
this._hostContainerInfo = null;
this._wrapperState = null;
this._topLevelWrapper = null;
this._flags = 0;
}我们将返回的实例命名为 ReactDOMComponent[ins]。
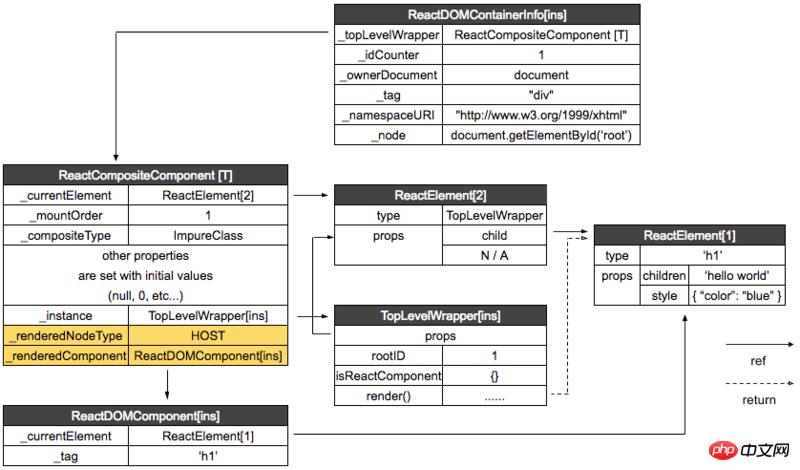
ReactReconciler.mountComponent 会调用 ReactDomComponent 的 mountComponent 方法,这就会涉及到 HTML DOM 相关的内容,我们在下一篇进行讲解。
现在我们来看一下各实例间的关系:

目前为止的调用栈:
(专业提供视频软件下载)
=ReactMount.render(nextElement, container, callback) ___
(专业提供视频软件下载)
=ReactMount._renderSubtreeIntoContainer() (专业提供视频软件下载)
(专业提供视频软件下载)
-ReactMount._renderNewRootComponent() (专业提供视频软件下载)
(专业提供视频软件下载)
-instantiateReactComponent() (专业提供视频软件下载)
(专业提供视频软件下载)
~batchedMountComponentIntoNode() upper half
(专业提供视频软件下载)
~mountComponentIntoNode() (平台无关)
(专业提供视频软件下载)
-ReactReconciler.mountComponent() (专业提供视频软件下载)
(专业提供视频软件下载)
-ReactCompositeComponent.mountComponent() (专业提供视频软件下载)
(专业提供视频软件下载)
-ReactCompositeComponent.performInitialMount() (专业提供视频软件下载)
(专业提供视频软件下载)
-instantiateReactComponent() _(专业提供视频软件下载)
_
(专业提供视频软件下载)
-ReactDOMComponent.mountComponent() lower half
(专业提供视频软件下载)
-_mountImageIntoNode() (HTML DOM 相关下一篇讲解)
_(专业提供视频软件下载)
_以上就是React首次渲染解析二(纯DOM元素)的详细内容,更多请关注php中文网其它相关文章!
网站建设是一个广义的术语,涵盖了许多不同的技能和学科中所使用的生产和维护的网站。
……