微信小程序案例详细说明:页面搭建
微信小程序,简称小程序,英文名Mini Program,是一种不需要下载安装即可使用的应用,它实现了应用“触手可及”的梦想,用户扫一扫或搜一下即可打开应用。小程序是一种不用下载就能使用的应用,也是一项门槛非常高的创新,经过将近两年的发展,已经构造了新的小程序开发环境和开发者生态。
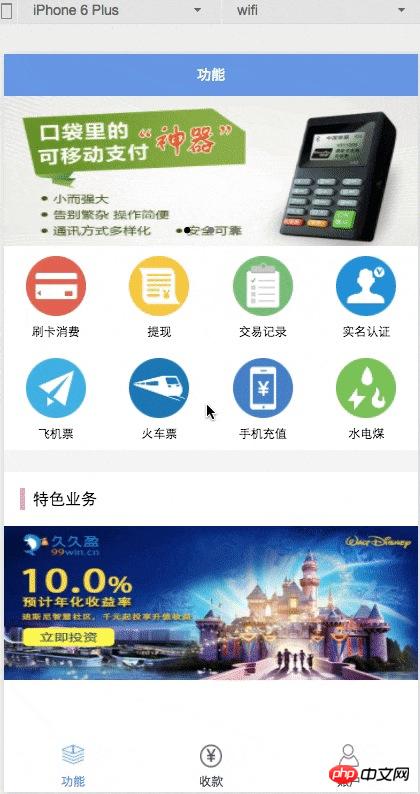
本文通过一个实际例子,来讲解如何进行微信小程序的页面搭建。首先看一下本文要实现的页面效果:

开发工具下载:微信官方有开发者工具,集成了开发调试、代码编辑及程序发布等功能。
微信小程序架构:

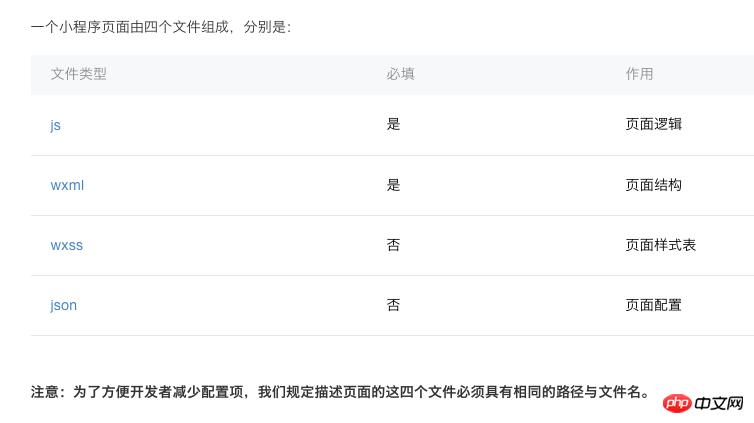
这个就是程序的基本架构。最关键也是必不可少的,是 app.js、app.json、app.wxss 这三个。其中,.js后缀的是脚本文件,.json后缀的文件是配置文件,.wxss后缀的是样式表文件。
底部标签底部标签是一个tabBar。实现比较简单,只需要简单配置一下即可。 app.json
{
  "pages":[
    "pages/function/function",
    "pages/pay/pay",
    "pages/account/account",
    "pages/index/index",
    "pages/logs/logs"
  ],
  "tabBar":{
    "color": "#464a56",
    "selectedColor": "#6595e9",
    "backgroundColor": "#FFFFFF",
    "borderStyle": "white",
    "list": [{
        "pagePath": "pages/function/function",
        "text": "功能",
        "iconPath": "images/tab_function_default.png",
        "selectedIconPath": "images/tab_function_sel.png"
    },{
        "pagePath": "pages/pay/pay",
        "text": "收款",
        "iconPath": "images/tab_consume_default.png",
        "selectedIconPath": "images/tab_consume_sel.png"
    },{
        "pagePath": "pages/account/account",
        "text": "账户",
        "iconPath": "images/tab_account_default.png",
        "selectedIconPath": "images/tab_account_sel.png"
    }]
  },
  "window":{
    "navigationBarBackgroundColor": "#6595e9",
    "navigationBarTextStyle":"white",
    "navigationBarTitleText": "V50",
    "backgroundColor": "#eeeeee",
    "backgroundTextStyle":"light"
  }
}
值得注意的地方,就是 pages 接受一个数组,每一项都是字符串,来指定小程序由哪些页面组成。每一项代表对应页面的【路径+文件名】信息,数组的第一项代表小程序的初始页面。
小程序中新增/减少页面,都需要对 pages 数组进行修改。
文件名不需要写文件后缀,因为框架会自动去寻找路径.json, .js , .wxml, .wxss的四个文件进行整合。
页面标题:
页面标题这个标题如何实现? 我们翻看一下官方文档。

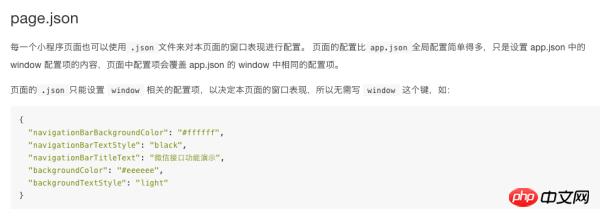
看到这里,你应该就知道了,需要在指定页面的json文件中进行页面配置。继续查看官方的文档

原来如此!我们只需要把所有页面通用的配置放在 page.json,然后在各个page的 .json文件里面配置每个页面特有的属性即可。因为在上面的 app.json 中已经配置了通用页面的 window属性了,我们只需要在function.json中配置页面标题即可:
{
     "navigationBarTitleText": "功能"
   }
轮播图
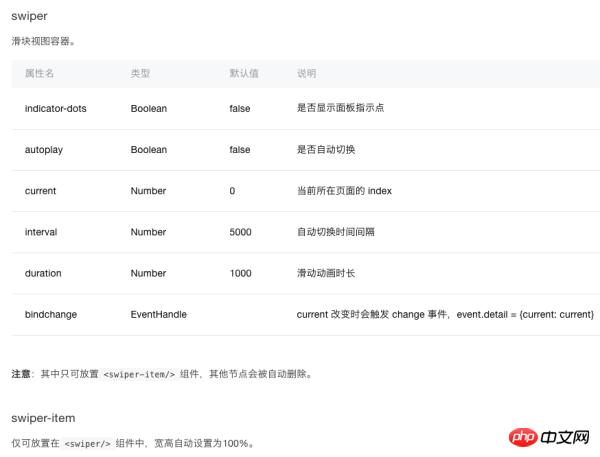
接下来实现顶部的轮播图。微信提供了一个swiper组件来实现轮播图。

代码也就出来了:function.wxml
<swiper indicator-dots="{{indicatorDots}}"
autoplay="{{autoplay}}" interval="{{interval}}" duration="{{duration}}">
<block wx:for="{{imgUrls}}">
<swiper-item>
<image src="{{item}}" class="slide-image" />
</swiper-item>
</block>
</swiper>
function.js
//function.js
Page({
data: {
indicatorDots: true,
autoplay: true,
interval: 5000,
duration: 1000,
imgUrls: [
'http://img02.tooopen.com/images/20150928/tooopen_sy_143912755726.jpg',
'http://img06.tooopen.com/images/20160818/tooopen_sy_175866434296.jpg',
'http://img06.tooopen.com/images/20160818/tooopen_sy_175833047715.jpg'
],
},
})没错,微信小程序的轮播图就是这么简单!在这里可能有的同学要问了:“轮播图的图片用的是url地址,如果我想用本地的图片呢?能不能实现? ”
这个官方文档没有介绍,但是我们经过测试,是可以实现的。代码如下
imgUrls: [
'../../images/adv_50.png',
'../../images/adv_60.png',
'../../images/adv_80.png'
],中间功能模块
中间的8个功能模块,类似Android的GridView效果。本文采取循环的方式来实现:function.wxml
<view class='function_container'>
<view class='function_item' wx:for="{{functions}}" wx:for-index="idx" wx:for-item="function">
<image class='function_img' src='{{function.pic_url}}'/>
<view class='function_name'>{{function.name}}</view>
</view>
</view>
function.js
functions: [
{
"name": "刷卡消费",
"pic_url": '../../images/icon_consume.png'
},
{
"name": "提现",
"pic_url": '../../images/icon_withdrawals.png'
},
{
"name": "交易记录",
"pic_url": '../../images/icon_records.png'
},
{
"name": "实名认证",
"pic_url": '../../images/icon_auth.png'
},
{
"name": "飞机票",
"pic_url": '../../images/icon_airplane.png'
},
{
"name": "火车票",
"pic_url": '../../images/icon_train.png'
},
{
"name": "手机充值",
"pic_url": '../../images/icon_phone_recharge.png'
},
{
"name": "水电煤",
"pic_url": '../../images/icon_water.png'
}
]
function.wxss
/**function.wxss**/
.container {
height: 650px;
}
.slide-image{
display: block;
height: 280rpx;
width:100%
}
.function_container{
display:flex;
flex-wrap: wrap;
width:100%;
}
.function_item{
width:25%;
display:flex;
flex-direction:column;
justify-content:center;
align-items:center;
font-size:12px;
box-sizing:border-box;
padding-bottom:10px;
padding-top:10px
}
.function_img{
width:60px;
height:60px;
}
.function_name{
padding-top:10px
}这里通过width:25% 来实现每行排列四个功能按钮的效果。
完整代码
下面的布局就比较简单了,直接上完整的代码了:function.wxml
<!--function.wxml-->
<scroll-view scroll-y="true" class="container">
<swiper indicator-dots="{{indicatorDots}}"
autoplay="{{autoplay}}" interval="{{interval}}" duration="{{duration}}">
<block wx:for="{{imgUrls}}">
<swiper-item>
<image src="{{item}}" class="slide-image" />
</swiper-item>
</block>
</swiper>
<view class='function_container'>
<view class='function_item' wx:for="{{functions}}" wx:for-index="idx" wx:for-item="function">
<image class='function_img' src='{{function.pic_url}}'/>
<view class='function_name'>{{function.name}}</view>
</view>
</view>
<view class='divider' />
<view class='specialities_layout'>
<view class='view_divider' />
<text class="specialities_text">特色业务</text>
</view>
<image class='bottom-image' src='../../images/app_banner.jpg'/>
</scroll-view>
function.wxss
/**function.wxss**/
.container {
height: 650px;
}
.slide-image{
display: block;
height: 280rpx;
width:100%
}
.function_container{
display:flex;
flex-wrap: wrap;
width:100%;
}
.function_item{
width:25%;
display:flex;
flex-direction:column;
justify-content:center;
align-items:center;
font-size:12px;
box-sizing:border-box;
padding-bottom:10px;
padding-top:10px
}
.function_img{
width:60px;
height:60px;
}
.function_name{
padding-top:10px
}
.divider{
background: #f5f5f5;
height: 40rpx;
width:100%;
}
.specialities_layout{
display:flex;
flex-wrap: wrap;
width:100%;
flex-direction:row;
margin-left: 16px;
margin-top:16px;
margin-bottom: 16px;
}
.view_divider{
background: #EEA9B8;
height: 40rpx;
width:10rpx;
}
.specialities_text {
margin-left: 8px;
font-size: 16px;
height: auto;
width:auto;
margin-top: 6rpx;
}
.bottom-image{
height: 280rpx;
width:100%;
}
.Absolute-Center {
margin: auto;
position: absolute;
top: 0; left: 0; bottom: 0; right: 0;
}
function.js
//function.js
//获取应用实例
var app = getApp()
Page({
data: {
userInfo: {},
indicatorDots: true,
autoplay: true,
interval: 5000,
duration: 1000,
// imgUrls: [
// 'http://img02.tooopen.com/images/20150928/tooopen_sy_143912755726.jpg',
// 'http://img06.tooopen.com/images/20160818/tooopen_sy_175866434296.jpg',
// 'http://img06.tooopen.com/images/20160818/tooopen_sy_175833047715.jpg'
// ],
imgUrls: [
'../../images/adv_50.png',
'../../images/adv_60.png',
'../../images/adv_80.png'
],
functions: [
{
"name": "刷卡消费",
"pic_url": '../../images/icon_consume.png'
},
{
"name": "提现",
"pic_url": '../../images/icon_withdrawals.png'
},
{
"name": "交易记录",
"pic_url": '../../images/icon_records.png'
},
{
"name": "实名认证",
"pic_url": '../../images/icon_auth.png'
},
{
"name": "飞机票",
"pic_url": '../../images/icon_airplane.png'
},
{
"name": "火车票",
"pic_url": '../../images/icon_train.png'
},
{
"name": "手机充值",
"pic_url": '../../images/icon_phone_recharge.png'
},
{
"name": "水电煤",
"pic_url": '../../images/icon_water.png'
}
]
},
//事件处理函数
bindViewTap: function () {
wx.navigateTo({
url: '../logs/logs'
})
},
onLoad: function () {
console.log('onLoad')
var that = this
//调用应用实例的方法获取全局数据
app.getUserInfo(function (userInfo) {
//更新数据
that.setData({
userInfo: userInfo
})
that.update()
})
}
})更多微信小程序案例详解:页面搭建相关文章请关注PHP中文网!
小程序是一种不需要下载安装即可使用的应用,它实现了应用“触手可及”的梦想,用户扫一扫或者搜一下即可打开应用。
……


