对于微信小程序中弹框与模态框的完成
微信小程序,简称小程序,英文名Mini Program,是一种不需要下载安装即可使用的应用,它实现了应用“触手可及”的梦想,用户扫一扫或搜一下即可打开应用。小程序是一种不用下载就能使用的应用,也是一项门槛非常高的创新,经过将近两年的发展,已经构造了新的小程序开发环境和开发者生态。
这篇文章主要介绍了微信小程序 弹框和模态框实现代码的相关资料,需要的朋友可以参考下微信小程序 弹框和模态框实现代码
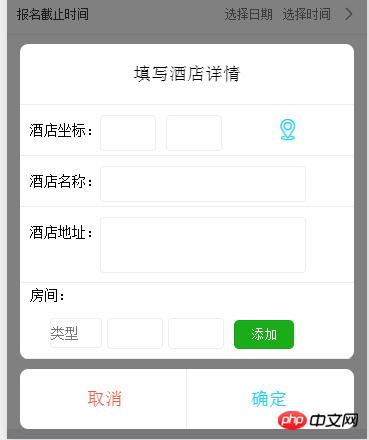
实现效果图:

实现代码:
 <view class="wxapp-modal" style="{{modal_style}}">
      <view class="content">
      </view>
     <view class="mask" bindtap="closeModal"></view>
    </view>
/*模态框*/
.wxapp-modal{
width: 100%;
height: 100%;
position: fixed;
top: 0px;
left: 0px;
z-index:999;
}
.wxapp-modal .content{
width: 100%;
bottom: 10px;
text-align: center;
position: absolute;
}
.wxapp-modal .content .header{
margin: auto;
width: 93%;
height: 60px;
line-height: 60px;
text-align: center;
background-color: #FFFFFF;
position: relative;
z-index:9999;
border-top-left-radius: 8px;
border-top-right-radius: 8px;
border-bottom: 1px #eee solid;
}
.wxapp-modal .content .body{
margin: auto;
width: 93%;
background-color: #FFFFFF;
position: relative;
z-index:9999;
border-bottom-left-radius: 8px;
border-bottom-right-radius: 8px;
overflow: hidden;
}
.wxapp-modal .content .footer{
margin: auto;
width: 93%;
height: 60px;
line-height: 60px;
background-color: #FFFFFF;
position: relative;
z-index: 9999;
border-radius: 8px;
margin-top: 10px;
text-align: center;
}
.wxapp-modal .content .footer button{
display: inline-block;
width: 49%;
height: 60px;
line-height: 60px;
background-color: #FFFFFF;
margin-left: 0px;
}
.wxapp-modal .content .footer button:active{
background-color: #eee;
}
.wxapp-modal .content .footer button::after{
content:none;
}
.wxapp-modal .content .footer .cancel{
color: #fa5b43;
border-right: 1px #eee solid;
border-top-right-radius: 0px;
border-bottom-right-radius: 0px;
border-top-left-radius: 8px;
border-bottom-left-radius: 8px;
}
.wxapp-modal .content .footer .confirm{
color: #1ed3fa;
border-top-left-radius: 0px;
border-bottom-left-radius: 0px;
border-top-right-radius: 8px;
border-bottom-right-radius: 8px;
}
.wxapp-modal .mask{
width: 100%;
height: 100%;
position: fixed;
top: 0px;
background-color:rgba(0,0,0,0.5);
}