clip-path的使用
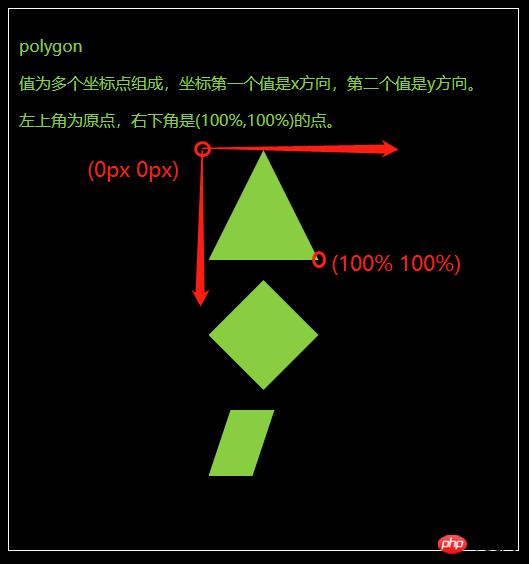
polygon
值为多个坐标点组成,坐标第一个值是x方向,第二个值是y方向。
左上角为原点,右下角是(100%,100%)的点。</p>
body {
  background-color: #000;
}

.fa {
  border: 1px solid #fff;
  color: yellowgreen;
  padding: 10px;
  margin: 10px;
}

.fa>p {
  width: 110px;
  height: 110px;
  background-color: yellowgreen;
  margin: 20px auto;
}

.polygon1 {
  clip-path: polygon(50% 0px, 100% 100%, 0px 100%)
}

.polygon2 {
  clip-path: polygon(0px 50%, 50% 0, 100% 50%, 50% 100%)
}

.polygon3 {
  clip-path: polygon(0% 60%, 20% 0%, 60% 0%, 40% 60%)
}
<div class="fa"> <p>polygon</p> <p>值为多个坐标点组成,坐标第一个值是x方向,第二个值是y方向。</p> <p>左上角为原点,右下角是(100%,100%)的点。</p> <div class="polygon1"></div> <div class="polygon2"></div> <div class="polygon3"></div> </div>

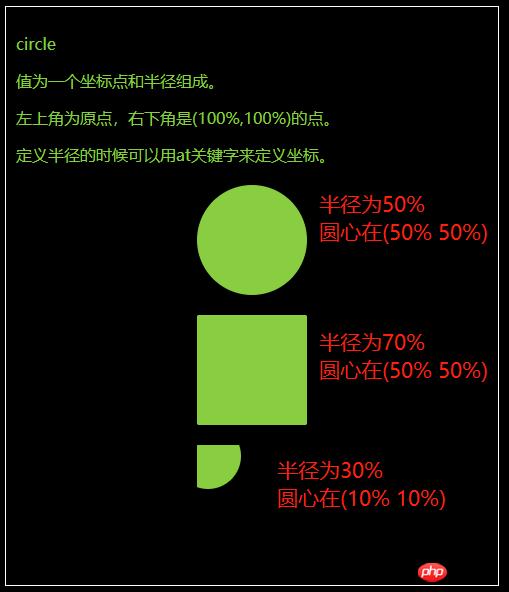
circle
值为一个坐标点和半径组成。
左上角为原点,右下角是(100%,100%)的点。
定义半径的时候可以用at关键字来定义坐标。
body {
background-color: #000;
}
.fa {
border: 1px solid #fff;
color: yellowgreen;
padding: 10px;
margin: 10px;
}
.fa>p {
width: 110px;
height: 110px;
background-color: yellowgreen;
margin: 20px auto;
}
.circle1 {
clip-path: circle(50% at 50% 50%)
}
.circle2 {
clip-path: circle(70% at 50% 50%)
}
.circle3 {
clip-path: circle(30% at 10% 10%)
}<div class="fa">
<p>circle</p>
<p>值为一个坐标点和半径组成。</p>
<p>左上角为原点,右下角是(100%,100%)的点。</p>
<p>定义半径的时候可以用at关键字来定义坐标。</p>
<div class="circle1"></div>
<div class="circle2"></div>
<div class="circle3"></div>
</div>
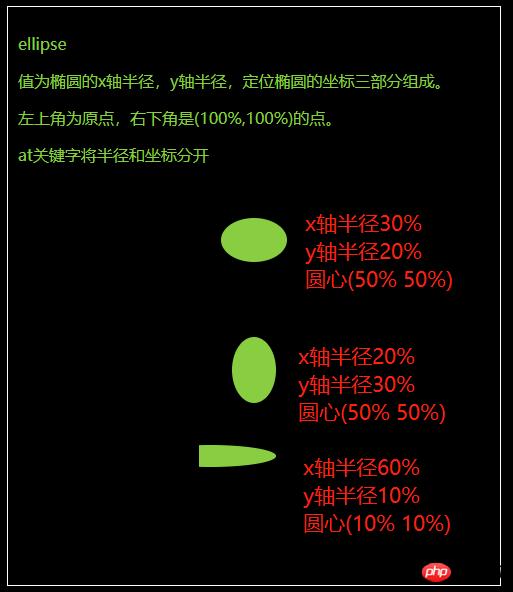
ellipse
值为椭圆的x轴半径,y轴半径,定位椭圆的坐标三部分组成。
左上角为原点,右下角是(100%,100%)的点。
at关键字将半径和坐标分开。
body {
background-color: #000;
}
.fa {
border: 1px solid #fff;
color: yellowgreen;
padding: 10px;
margin: 10px;
}
.fa>p {
width: 110px;
height: 110px;
background-color: yellowgreen;
margin: 20px auto;
}
.ellipse1 {
clip-path: ellipse(30% 20% at 50% 50%)
}
.ellipse2 {
clip-path: ellipse(20% 30% at 50% 50%)
}
.ellipse3 {
clip-path: ellipse(60% 10% at 10% 10%)
}<div class="fa">
<p>ellipse</p>
<p>值为椭圆的x轴半径,y轴半径,定位椭圆的坐标三部分组成。</p>
<p>左上角为原点,右下角是(100%,100%)的点。</p>
<p>at关键字将半径和坐标分开</p>
<div class="ellipse1"></div>
<div class="ellipse2"></div>
<div class="ellipse3"></div>
</div>
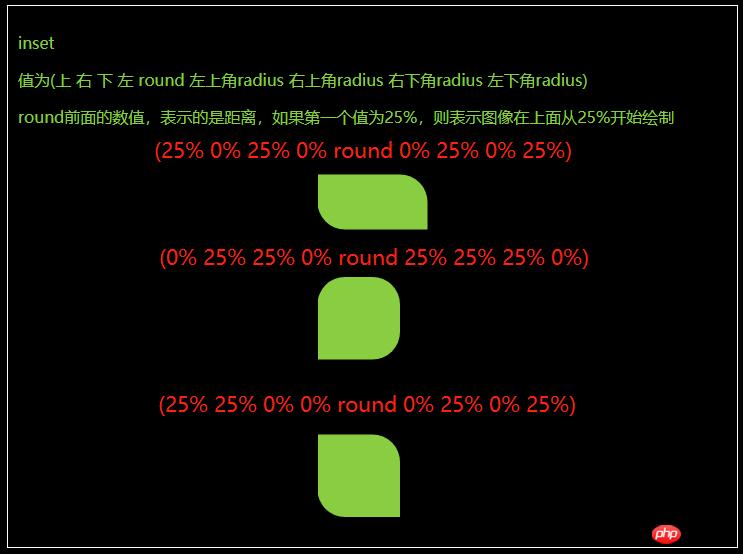
inset
值为(上 右 下 左 round 左上角radius 右上角radius 右下角radius 左下角radius)
round前面的数值,表示的是距离,如果第一个值为25%,则表示图像在上面从25%开始绘制。
body {
background-color: #000;
}
.fa {
border: 1px solid #fff;
color: yellowgreen;
padding: 10px;
margin: 10px;
}
.fa>p {
width: 110px;
height: 110px;
background-color: yellowgreen;
margin: 20px auto;
}
.inset1 {
clip-path: inset(25% 0% 25% 0% round 0% 25% 0% 25%)
}
.inset2 {
clip-path: inset(0% 25% 25% 0% round 25% 25% 25% 0%)
}
.inset3 {
clip-path: inset(25% 25% 0% 0% round 0% 25% 0% 25%)
}<div class="fa">
<p>inset</p>
<p>值为(上 右 下 左 round 左上角radius 右上角radius 右下角radius 左下角radius)</p>
<p>round前面的数值,表示的是距离,如果第一个值为25%,则表示图像在上面从25%开始绘制</p>
<div class="inset1"></div>
<div class="inset2"></div>
<div class="inset3"></div>
</div>
以上就是css中clip-path属性的用法讲解(附代码)的详细内容,更多请关注php中文网其它相关文章!
网站建设是一个广义的术语,涵盖了许多不同的技能和学科中所使用的生产和维护的网站。
……